Part 15 of the RACing ahead with Oracle on VMware Series looks at the companion CD installation and DBCA, creating the ASM instances.
A Brief Pep talk: How to move ahead with other platforms?
Oracle RAC runs on various platforms. We have looked Windows, and we are almost done with Linux, but how many different RAC configurations are there? Taking a quick look at the Oracle website, we see the following. This applies to Oracle RAC 10gR2.
*All Release 2 download pages contain Oracle Companion, Client, Clusterware, Gateways, and Application Express standalone downloads
So as you can see, all releases. We are getting lucky; VMware is officially starting experimental support for Solaris and soon I hope they will add support for MAC OS X. That is great news for us as we will be able to continue our RAC installations on these OSs as well. Although MAC does not come in the list there is a support for version 10.1. Check out this download link.
In addition, if you want VMware to really take notice, you can also go ahead and sign a petition.
Installing Companion CD
Lets get started now with our installation (which we are close to completing) of the companion CD and the DBCA. You actually do not need the Companion CD but should you do a complete database installation and use services such as interMedia and JVM or play around with SQLJ, then it is helpful to have this installation complete as well.
OK without further ado, let's get started here.
Welcome, click next.
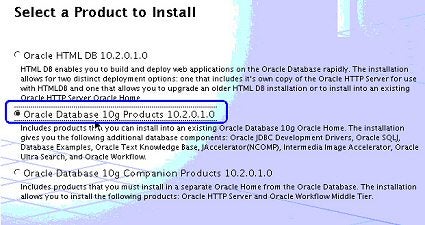
We go ahead and pick up "Oracle Database 10g Products 10.2.0.1.0."

Specify name and path according to your installation guidelines, here we pick the defaults:

Specify Hardware Cluster Installation Mode. Here you can see that both nodes are automatically selected:

Product Specific Prerequisite Checks: All completed. It is very crucial to have them completed.

Quick look at the Summary:

This one goes pretty fast and at the end you get a link to your "UltraSearch" URL and you are done.

DBCA installation:
DBCA is the database creation agent, although in previous versions, you
could also install complete databases via scripts. I advise using the tools
provided in the installation pack as these tools have matured enough since
version 8.
Don't forget to check that Oracle homes like $ORACLE_HOME and $PATH
are set properly. Again, we will allow for remote connections.
To start the database creation process, run the following:
# xhost +
access control disabled, clients can connect from any host
Now change back to Oracle use:
# su oracle
And start the DBCA tool:
$ dbca &
Here we choose the RAC option; you can also choose the single instance
database option as well.

Choose the "Create a Database" option:

Select all the available nodes by clicking on "Select All":

We take a "Transaction Processing" option (as we will, at some
point on our course to "Administering our Oracle RAC" series, do some
stress testing):

Select your GDN (Global Database Name). It could be "node1.mysite.com"
and SID (Oracle System Identifier) prefix. Typically, "node1" will suffice;
at least, I prefer it to have the same name as my GDN.

Here you are presented with several options, such as "Configuring the
Database with Enterprise Manager", SMTP options such as email notification
and email address. If you have your own DNS server running on another VMware
Server, then you have all that information, if not create a small Linux box on
a Virtual Server and create your little enterprise at home.

I chose the same password here; however, you will want to check your
security policy, if you are planning to do this eventually in production.

Select the storage mechanism; there are several discussions on what to
choose for what. We will pick ASM for our data. I am curious about the
CFS as well, but I did not see to get past the errors when installing RAC on
CFS signed disks. RAW devices are also a workable option. However, we will go
ahead with what Oracle recommends.

Here we needed an ASM instance running. Should you be doing this on an previously
RAC ready node, then your ASM instances were already running. Since this is a
fresh install, we go ahead and opt for SYS password (that is the only one on
ASM instance). Choosing the type of parameter file. We
created a OCFS disk signed as spfileASM and we pick that option here.
Note: There are a lot of ASM parameters you can set by clicking on the ASM
Parameters button but we won't go into details now.

All values filled in correctly and we can get our DBCA to create and start
the ASM instances on all nodes. This will successfully start the ASM nodes. Do
check your instances to see if they are running.

Conclusion
In this
article, we looked at the companion CD installation and went ahead with the
DBCA work and creating the ASM instances. We will go ahead with the creation of
the ASM disk groups in our next article. On another note, I have already
started testing the Solaris 10 on VMware Server as well as the new ESX 3.0
server.
The installation is a breeze. I will try to keep the progress updated on my
Oracle Performance Blog.
»
See All Articles by Columnist Tarry Singh